1")
Table of Contents
Why Background Removal Still Matters in 2025
In 2025, the online visual landscape is faster and sharper than ever. AI-driven design tools and smarter algorithms mean one thing—image quality directly impacts conversions. A clean, distraction-free background helps your product dominate screens, whether it’s an Instagram reel thumbnail or a 3D shopping ad.
In the world of photography, especially product photography, a clean and focused image is everything.
A background remover is no longer a “nice-to-have.” It’s a core part of visual branding for any eCommerce business.
Top product photography studios (including Pro Photo Studio) now use AI-enhanced background removers that automatically refine edges, manage lighting spill, and preserve product shadows for realism—essential for marketplaces like Amazon and Walmart that penalize harsh cutouts.
 2")
Why Use a Background Remover?
Removing the background from images isn’t just about aesthetics; it’s about clarity, storytelling, and making sure your products shine. Here are the top reasons why every photographer, marketer, and online seller should be using a background remover:
Enhanced Focus: A background remover eliminates any visual noise, keeping the focus solely on the product. This is especially crucial in e-commerce, where customers want to see the product in detail without distractions.
Professionalism: Clean, polished photos scream professionalism. Whether you’re creating images for your website, Instagram, or an Amazon listing, background-free images appear more refined and credible.
Versatility: By removing the background, you can superimpose your product onto different settings, adjust colors, or create unique marketing materials. This is a game-changer for ad creatives, banners, or social media posts.
When to Use a Background Remover (and When Not To)
Now, you may be wondering when exactly you should use a background remover. While it’s a go-to tool for product photography, there are specific scenarios where it’s especially useful:
eCommerce listings on Amazon, Shopify, and Etsy — still the top requirement for white backgrounds.
Social media ads where contrast against a neutral tone makes scroll-stopping content.
AI composites where you merge products into lifestyle scenes or virtual sets.
Short-form videos (Instagram Reels, TikTok, YouTube Shorts) where background cleanup keeps focus on motion rather than clutter.
Avoid overuse. Background removal should simplify, not sterilize. For lifestyle or editorial product shots, soft contextual backgrounds often convert better.
See more articles: How to Rank Your Website on ChatGPT in 2024
How to Remove Backgrounds from Your Images
AI competition is fierce—so let’s cut to what’s really working this year:
| Tool | Best For | 2025 AI Update | Free Tier |
|---|---|---|---|
| Pro Photo Studio AI Editor | Studio-level results | Supports shadow recovery, batch processing, & auto background replacement | ✅ |
| Remove.bg | Fast processing of bulk photos | Auto edge refinement 3.0 launched Feb 2025 | ✅ |
| Adobe Photoshop (Firefly) | Precision masking & generative fill | New “Select Object AI” trained on Firefly v3 | ❌ |
| PhotoRoom | Product photos for mobile sellers | AI relighting & shadow synthesis | ✅ |
| Fotor | Quick social media composites | Background blur & color grading automation | ✅ |
| Canva Pro | Quick eCommerce edits | Now includes batch AI cutouts + shadow restore | ✅ |
Pro tip: For brand consistency, use the same remover for all your campaigns. Inconsistent shadows and edges can ruin your brand’s visual cohesion.
The Top AI Background Remover Tools for 2025
Let’s get hands-on! Whether you’re a beginner or a pro, removing backgrounds is easier than you might think. Here’s how to do it using some popular tools.
The Rise of Video Background Removal
By mid-2025, video background removers have evolved beyond green screens. Canva, Runway ML, and Veed.io now use real-time segmentation to remove or replace video backgrounds dynamically.
Best uses for 2025–2026:
Product demo reels
AR shopping previews
Lifestyle video loops for ad banners
⚡ Tip: Always shoot against high-contrast backgrounds (white or green) to make AI segmentation flawless.
Brush Tools: Erase and Restore with Precision
Manual control still matters when working with reflective surfaces like jewelry or glassware.
Use soft-edged brushes for hairlines or fabric fringes.
Zoom to 300–400% for fine detail refinement.
Toggle Show Original often to compare your cutout.
If your goal is ultra-premium output, hand retouching paired with AI removal yields the most natural results.
Using Canva’s Background Remover on Videos
 3")
Canva has made background removal from videos as simple as possible, though the feature comes with some limitations. Here’s how you can do it:
- Upload Your Video: Start by uploading your video through Canva’s Uploads tab (note: videos must be less than 90 seconds long for background removal).
- Click ‘Edit Video’: In the toolbar above the editor, you’ll find this option once your video is selected.
- Choose ‘Background Remover’: The background remover option is located in the side panel. Click it, and Canva will automatically process the video to remove the background.
- Wait for Processing: This step may take a few moments, depending on the length of your video.
- Review and Adjust: Once the background is removed, preview your video to ensure everything looks perfect.
- Export Your Video: Once you’re happy with the results, export your video and use it wherever you need!
Background Removal for Longer Videos
If your video is longer than 90 seconds or you want more control over the background removal process, consider using professional video editing software like Adobe Premiere Pro or After Effects. These tools allow you to manually mask and key out backgrounds using green screen technology for high-quality results.
See more articles: 5 Best Hand Grip Camera Straps in 2024
How to Use the Erase and Restore Brushes
For precise control over your background removal, especially in images with fine details, the erase and restore brushes are your best friend. These tools let you manually fine-tune areas that automated processes may miss.
- Select Your Image: After using the background remover tool, click ‘Erase’ or ‘Restore.’
- Adjust Brush Size: You can change the brush size depending on the level of detail required.
- Manually Edit: Carefully brush over the areas you want to erase or restore, making sure not to accidentally remove important parts of your image.
- Preview the Original Image: Select ‘Show Original Image’ to compare your edits with the original.
- Apply Changes: Once you’re satisfied with the adjustments, click ‘Apply.’
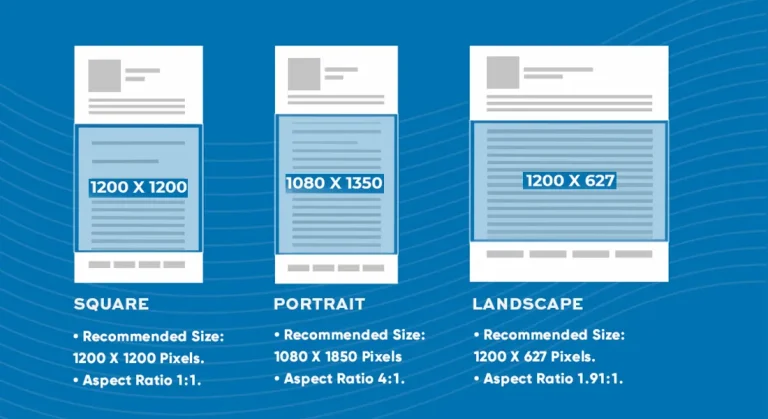
See more articles: A Guide to Facebook and Instagram Post Sizes, Ad Specs, and Photo Dimensions
Tips for Achieving the Best Results with Background Removers
✅ Use 8K-ready source images (minimum 4000px wide).
✅ Shoot under diffused daylight or 5600K LEDs to minimize color cast.
✅ Export in PNG-24 to preserve transparency and color depth.
✅ Add realistic shadow layers in post for authenticity.
✅ Test how your cutouts appear on both dark and light backgrounds—adaptive shading is key.
Frequently Asked Questions (FAQs) About Background Removers
Pro Photo Studio, Photoshop’s Firefly 3 and Remove.bg Pro are leading for precision, but Canva remains fastest for quick jobs.
Yes. Runway ML, Canva Pro, and Veed.io use AI segmentation for clean extractions in under a minute.
If you process more than 50 images monthly, a paid plan saves time and preserves quality—free tools often compress images or watermark outputs.
Tools like Photoshop offer advanced features such as ‘Select and Mask’ to handle intricate details, or you can use Canva’s brush tools to manually refine edges.
if you’re looking to increase your online conversion but still feel you are not sure where to start – check out these resources below: