GIFs are a brilliant way to bring your images to life. Imagine the moments in between shots—those expressions, the slight gestures, or even a fast-moving scene—looping seamlessly to tell a story.
For Product photographers, GIFs aren’t just cool; they’re a way to add dimension to your work. They offer a touch of motion without the commitment of a full video, and with Photoshop, creating a GIF is a surprisingly satisfying process.
Let’s dive into the basics and get you creating eye-catching, share-worthy GIFs in no time.
Table of Contents
What You Need to Create a GIF in Photoshop
Before jumping in, gather your essentials to set yourself up for success:
- Camera: Any camera can work, but for the best control, use one that allows manual settings.
- Tripod: A professional tripod o keep your shots consistent, especially if you’re shooting a time-lapse or a motion sequence.
- Adobe Photoshop: Ensure your Photoshop version has timeline capabilities (Creative Cloud versions all do).
- Photos: Whether you’re working with a burst of images or creating a time-lapse, keep them organized in a folder for easy importing.
Creating a GIF in Photoshop is easy and powerful! Start by loading your images as layers, then use the Timeline feature to create frame animations. Set frame durations for smooth transitions—typically 0.1–0.2 seconds per frame for a snappy effect.
Optimize your GIF using Save for Web (Legacy) with settings like 256 colors and looping forever. Ideal resolution for crisp quality: 1200x800 pixels at 300 DPI. Add text, adjust timing, and experiment with effects like frame blending or layered motion graphics for dynamic, eye-catching results!
Step 1: Import Your Images into Photoshop

Once you’ve taken your shots, it’s time to bring them into Photoshop.
- Load Images: Open Photoshop and go to
File > Scripts > Load Files into Stack. Select your images to load them as layers. - Layer Order: Ensure your images are in the right order. If needed, drag layers up or down in the Layers panel. This is key for smooth motion.
Step 2: Creating the Timeline

Now, let’s get that timeline up and running:
- Open Timeline: Go to
Window > Timeline. This brings up the timeline panel at the bottom of the screen. - Create Frame Animation: Click on
Create Frame Animation. Now, each layer will act as an individual frame in your GIF.
Pro Tip: The more frames you have, the smoother your GIF. But remember, too many frames can make the file heavy. Aim for a balance that looks good without weighing down your load time.
Step 3: Editing Your Frames
This is where your creativity shines. Each frame can be individually adjusted for color, contrast, or even composition tweaks.
- Color Correction: Adjust the color or brightness to ensure consistency across frames.
- Add or Remove Frames: If some frames feel unnecessary, you can delete them. Or, if you need a smoother transition, duplicate frames and adjust their timing slightly.
| Frame | Action | Notes |
|---|---|---|
| 1 | Add Contrast | Slight increase needed |
| 2 | Adjust Color | Warm up by +5 degrees |
| 3 | Duplicate | Smooth transition |
Step 4: Adjusting the Timing
Timing is everything. Setting frame duration determines how long each image stays visible.
- Frame Duration: Select all frames, click on the time under each frame, and choose your desired speed. Faster durations like 0.1–0.2 seconds give a snappy feel, while longer ones like 0.5 seconds work well for a cinematic pace.
- Looping Options: Decide whether you want your GIF to loop forever or just once. Looping adds a hypnotic effect, while single-play is best for storytelling.
Pro Insight: If you’re going for a loop, aim for a seamless start and end. A well-looped GIF is a thing of beauty!
Step 5: Preview and Fine-Tune Your GIF

Don’t skip this step—previewing lets you see your GIF in motion and spot any odd transitions.
- Preview: Click the play button in the Timeline panel. Watch for any jerky movements or color inconsistencies.
- Adjustments: If any frame seems off, click on it and make edits. This final touch can be the difference between a GIF that feels professional and one that looks rushed.
Step 6: Exporting Your GIF


Exporting the GIF is your final step, and it’s important to choose the right settings to keep quality high.
- Export Options: Head to
File > Export > Save for Web (Legacy). This window has settings specifically for web formats, including GIF. - Optimize: Set the file type to GIF, adjust the colors (256 is typical for high quality), and ensure “Looping” is set to Forever if you want it to repeat.
- File Size Consideration: Larger files are crisp but load slowly on the web. Adjust settings to keep your GIF under 5MB for easy sharing.
| Setting | Recommended Value | Notes |
|---|---|---|
| Format | GIF | Essential for animation |
| Colors | 256 | Best quality for web |
| Looping | Forever | Ensures endless playback |
Exploring Advanced Techniques for GIFs in Photoshop
Once you’ve nailed the basics, there are even more ways to enhance and personalize your GIFs. Here are some advanced techniques that will make your GIFs pop:
1. Add Subtle Movements for a Cinemagraph Effect
Ever seen those mesmerizing GIFs where just one part of the image is moving? That’s a cinemagraph—a hybrid of photo and video that feels almost magical.
How to Do It: Take a video clip where only one element is in motion, like a fluttering flag or rippling water. In Photoshop, isolate the moving element by masking it while keeping the rest of the frame still. Use the timeline to loop just that area.
Effect: This technique adds sophistication and makes your GIFs feel like high-end visuals. It’s perfect for brands or anyone looking to make a statement.
2. Experiment with Frame Blending
Frame blending softens transitions between frames, making motion appear smoother—ideal if you’re working with fewer frames or want a dreamy effect.
How to Enable Blending: Select all frames in the Timeline panel, go to the Options menu, and activate Frame Blending.
Result: This can be especially useful if you’re working with photos taken at different exposures or when creating time-lapse GIFs. Blending can turn jerky motion into a seamless flow.
3. Layered Motion Graphics
Want to give your GIF that extra wow factor? Try adding layered animations on top of your main sequence.
Create Layer Animations: Besides your primary frames, add a text layer or graphic element (like a logo or icon) and animate it separately in the timeline. This is great for product highlights, branding, or just adding a bit of sparkle.
Example Use: Imagine a GIF of a product where an animated text, like “Best Seller” or “Limited Edition,” pops in at key moments. It’s a great way to add context without needing a separate graphic.
| Technique | Steps | Effect |
|---|---|---|
| Add Subtle Movements | Isolate a moving element in a still frame using masking and loop it in the timeline. | Creates a high-end, sophisticated cinemagraph effect. |
| Frame Blending | Select all frames, go to Options, and enable Frame Blending. | Smooths transitions, ideal for time-lapse or varied exposure photos. |
| Layered Motion Graphics | Add a text layer or graphic, animate it separately in the timeline. | Adds context and branding with animated text or icons. |
Creative Tips for GIF Mastery
Once you have the basics down, don’t be afraid to add some flair to your GIFs:
- Text Overlay: Adding a caption or a small title can add context and make your GIFs more engaging.
- Subtle Animations: For example, fading in or out adds sophistication. Experiment with opacity or even tiny zoom effects to highlight specific frames.
- Marketing with GIFs: GIFs can show off product features, demonstrate movement in fashion, or even provide mini-tutorials. Imagine a quick three-frame GIF for Instagram showcasing a product from different angles—it’s eye-catching and tells a story.
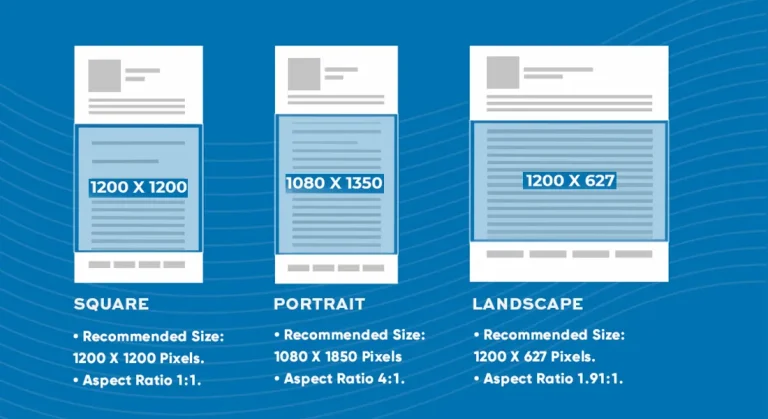
Optimize Your GIF for Different Platforms
GIFs don’t look the same everywhere. Different platforms have various requirements and restrictions, so optimizing your GIFs for each one ensures they look their best wherever they’re shared.
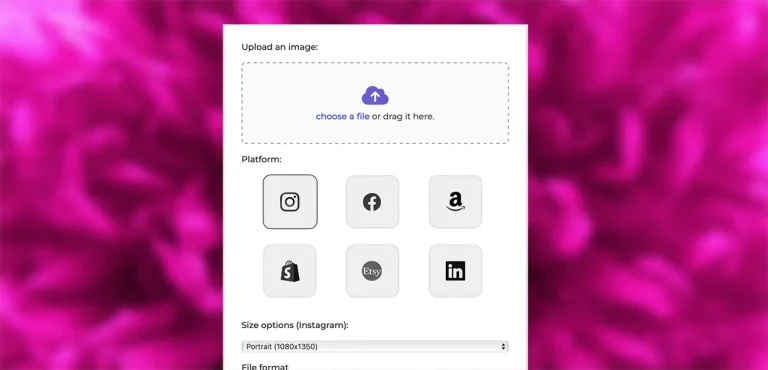
Instagram doesn’t support direct GIF uploads, but there’s a workaround.
- Convert GIF to Video: Use Photoshop or another tool to export your GIF as an MP4, which Instagram does support. MP4s are also higher quality and allow you to maintain file size limits more easily.
- Looping Tip: To make it loop like a GIF, choose a short duration and use Instagram’s built-in looping feature.
Facebook supports GIFs, but file size can be an issue.
- Resolution Matters: With Facebook, try to keep your resolution at 720px on the longest side. This keeps the GIF sharp without overloading on file size.
- Consider File Size: Aim for under 5MB if possible. Facebook compresses larger files, which can lead to pixelation or choppy quality.
Website or Portfolio
For website use, balance quality with load time.
- Optimize for Web: Choose the
Save for Weboption in Photoshop to compress the GIF. Play around with different levels of color and resolution to find a happy medium. - Lazy Load: If you’re embedding GIFs in a website, use lazy loading. This ensures that your GIFs load only when users scroll to them, improving site speed and user experience.
Creative GIF Ideas for Photographers
Progress Shots.
Ever wondered how much a product photo changes from raw to final? A GIF progression of your editing steps is an impressive way to showcase your skill. For example, start with the raw image, add each layer of adjustment, and end with the polished result.
Spreadsheet Progress Example:
| Step | Action | Result |
|---|---|---|
| 1 – Raw | Import | Original state |
| 2 – Color Adjust | Brighten & Balance | Improved lighting |
| 3 – Sharpness | Apply Filter | Clearer details |
| Final | Add Finishing Touches | Polished and complete |
Time-Lapse of Your Workspace
Set up your camera to capture you in action—whether it’s organizing props, setting up lighting, or adjusting your camera. It’s a small, personable detail that clients love, adding a human touch to your brand.
The Final Touch: Adding Your GIFs to a Portfolio
Once you’ve created a few GIFs, consider adding them to your online portfolio. They’re a great way to add variety and interest, especially for potential clients who want to see dynamic work.
Tips for Embedding GIFs:
- Make sure they’re optimized for web to avoid slow page load times.
- If you’re embedding several GIFs, consider breaking them into sections with individual load triggers to keep the page responsive.
Highlight Specific Services:
Use GIFs to show services like product demos or lifestyle photoshoots. It’s an immediate, engaging way for clients to understand what you offer.
Why GIFs Are Perfect for Product Photography
GIFs are where photography meets motion, and they’re packed with potential. From capturing the energy of a moment to adding personality to your portfolio, they’re versatile, memorable, and just plain fun to create. With Photoshop, you have the power to control every detail and make each GIF unique to your style.
GIFs offer a unique advantage for product photography by bringing images to life and adding a dynamic touch to otherwise static visuals. A short, looping animation can showcase a product from multiple angles, highlight special features, or even simulate the product’s usage—all in a few seconds. This interactivity can capture a viewer’s attention, enhance engagement, and make your work more memorable.
So, experiment, play around, and see what you can create. GIFs might just become your secret weapon for standing out as a photographer. They bring images to life, spark engagement, and offer endless ways to connect with audiences.
Let your creativity flow, and who knows? Your next GIF could be the thing that sets your portfolio apart.
| Technique | Steps | Effect |
|---|---|---|
| Add Subtle Movements | Isolate a moving element in a still frame using masking and loop it in the timeline. | Creates a high-end, sophisticated cinemagraph effect. |
| Frame Blending |
Frequently Asked Questions (FAQs) AboutAI Video Generator
Follow these steps to create a GIF in Photoshop. This guide will take you from importing your images to optimizing your GIF for web use.
- Import Your Image Sequence: Go to
File > Scripts > Load Files into Stackto add each image as a separate layer. - Open the Timeline Panel: Navigate to
Window > Timelineto open the Timeline panel at the bottom of the screen. - Create Frame Animation: In the Timeline panel, select
Create Frame Animation, then set each layer as a frame. - Adjust the Timing: Customize the duration for each frame to control the speed of your GIF.
- Preview Your GIF: Play the animation in the Timeline panel to make sure everything looks smooth and flows as desired.
- Export and Optimize: Once satisfied, go to
File > Export > Save for Web (Legacy)to optimize your GIF for web use.
Converting a series of images to a GIF in Photoshop is straightforward. Follow these steps to create and optimize your GIF:
- Load Images as Layers: Open Photoshop and load your images as separate layers. Go to
File > Scripts > Load Files into Stack. - Open the Timeline Panel: Navigate to
Window > Timelineto display the Timeline panel. - Create Frame Animation: In the Timeline panel, select
Create Frame Animation. Each layer will now become a frame in your GIF. - Adjust Frame Duration: Customize the duration of each frame to achieve the desired animation speed.
- Preview the Animation: Play the animation in the Timeline panel to ensure the GIF looks smooth.
- Export as GIF: Go to
File > Export > Save for Web (Legacy)to export and optimize your GIF for web use.
The ideal frame rate for GIFs depends on the effect you want. Here are some guidelines to help you achieve the perfect motion:
- Quick and Snappy: A faster frame rate, such as 0.1 seconds per frame, creates a rapid and energetic feel, ideal for fun or action-packed GIFs.
- Cinematic Touch: Slower rates, around 0.3 to 0.5 seconds per frame, add a more cinematic, gradual effect. This is suitable for dramatic or artistic GIFs.
- Smooth, Continuous Motion: For a balanced effect, aim for a frame rate between 0.1 to 0.2 seconds per frame. This range generally produces smooth, seamless motion.
Experiment with different frame rates to find the right balance for your GIF’s style and purpose.
if you’re looking to increase your online conversion but still feel you are not sure where to start – check out these resources below: